3. How do I change or add new BuddyPress profile icons?
4. I get a "Warning: Cannot assign an empty string to a string offset" when installing the theme?
5. How do I modify X and Y on my BuddyPress pages?
6. Increasing WordPress Upload Limit
7. I cannot see the icons on my site?
8. How do I add/remove breadcrumbs?
9. Increasing PHP Memory Limit
10. How do I restrict access to BuddyPress content?
11. Increasing Maximum Input Vars
12. How do I restrict access to the BuddyPress members directory and profile pages?
13. How do I modify the BuddyPress registration fields/template?
14. Increasing Post Maximum Size
15. How can I order posts by views daily, weekly or monthly?
16. How I do I disable the WordPress Admin Bar for users?
17. Creating BuddyPress Profile Menus
18. Adding new fonts to your website
19. How do I enable comments on pages?
20. Can I import more than one demo on my site?
21. WPBakery Page Builder says I need to activate a license?
22. How do I add a custom captcha to the pop login and register forms?
23. How do I set up the bbPress forum like the demo?
24. Adding page settings to custom post types, taxonomies and templates
25. How do I remove the latest activity update in the profile header?
26. How do I disable the Gutenberg editor?
27. How do I show inactive members in my BuddyPress members directory?
28. How do I create BuddyPress groups?
29. How do I add a BuddyPress cover image?
30. I would like a refund?
31. I can't login because it says "Incorrect Captcha"?
32. Can't access BuddyPress pages/features?
33. I can't update the theme - it says update failed?
34. I can't login after clicking my BuddyPress email activation link?
35. It says the theme is broken or missing a style sheet?
36. Why am I not receiving emails?
37. Removing the copyright text from Youzify Panel
38. Adding different menus to different pages
39. Pagination is not working on my posts
40. Modifying Youzify BuddyPress pages
41. Enabling the "BuddyPress Legacy" Template Pack
42. Grey images when importing demo data
43. Editing registration emails
44. Updating WPBakery Page Builder with the theme
45. Editing the BuddyPress profile tabs
46. Default image dimensions and registering new image dimensions
47. Updating the theme and bundled plugins
48. Users can't see activity when Youzify is activated
49. How to change the membership circles image on the homepage?
50. After updating BuddyPress my website won't load or I get a fatal error?
51. What SEO plugin do you recommend?
52. I can't change the site title and description on the homepage?
53. Error messages on Youzify Activity page
54. Limit the number of cores using MAGICK_THREAD_LIMIT
55. Finding the cause of your issue(s)
56. My BuddyPress widgets have disappeared?
57. Theme and Youzify login forms
58. How to install the default Twenty-Twenty * themes?
59. Media uploaded via Activity post are not shown
60. BP Profile Search error: Form ID # is empty or nonexistent.
61. How do I add/edit the favicon?
62. Adding captcha to Login and Register forms
63. How do I allow users to register to my site?
64. Experiencing issues after updating from Youzer to Youzify
65. How to add custom fields
66. How do I find my ThemeForest Item Purchase Code?
67. I can see shortcodes in my excerpts - how do I use custom excerpts?
68. After updating Aardvark my style customisations are not working
69. How to change the homepage icons and colors
70. I get a Page Not Found error when I click on links?
71. Load More Button showing duplicate content
72. "The link you followed has expired. Please try again." error
73. BuddyPress members and groups have not been imported?
1. Increasing PHP Maximum Execution Time
To increase the PHP Maximum Execution Time do the following:
Method 1: Editing .htaccess File Manually
Step 1: Locate the .htaccess file inside the root of your WordPress installation (located in the same folder as your /wp-content/ and /wp-admin/ directories) using an FTP client or file manager in your web hosting control panel (if you can’t find it see why you can’t find the .htaccess file and how to find it or if you’re not sure how to do this, ignore the steps below and contact your web host who can do this for you).
Step 2: Paste this code in your .htaccess file:
php_value max_execution_time 180
Step 3: Now save the file.
Note: If you still get the error, try increasing the value to 600.
Method 2: Using A Plugin
Step 1: If you're not able to edit .htaccess file manually, then you can install and activate the WP Maximum Execution Time Exceeded plugin. That’s all. The plugin works out of the box and increases the maximum execution time to 300 seconds.
2. Updating your PHP version
The theme requires at least PHP 7.3 or above because this is what WordPress itself recommends.
Updating Your PHP Version
In most cases you cannot update the PHP version yourself and need to contact your host about this. The upgrade process is easy and should be something your host can do for you without impacting your website or charging you a fee. Here's an email you can send to your hosting company:
Dear host,
I'm running a site on one of your servers and WordPress has listed PHP 7.2 as the recommended version on their requirements page: https://wordpress.org/about/requirements/
Can you please let me know if my hosting supports PHP 7.2 or higher and how I can upgrade?
If your host doesn't support PHP 5.6 or higher, you will need to find a host that does. We recommend DreamHost which supports PHP 5.6 or higher. If you contact another host, be sure to ask them which PHP version your website will run on before purchasing.
3. How do I change or add new BuddyPress profile icons?
The theme adds icons to the profile menu navigation tabs. However if you're using a plugin to add new profile tabs or want to change the existing icons you can do this using CSS. Go to Theme Options > Styling and in the CSS Code box add:
This code controls all the existing tabs. You can replace each icon code above with one of the icon codes here.
If you want to add icons to new tabs you need to use your browser inspector to right click on the icon, select Inspect/Inspect Element and find the ID of the tag.
However beyond this since BuddyPress is a third party plugin and is not part of the theme you should contact BuddyPress support at http://buddypress.org/support where they will be able to help you with modifying BuddyPresss templates.
While the theme completely supports BuddyPress, and even has customized BuddyPress elements, support does not cover customisations (click here for the support policy), this both includes customising the theme and third party plugins.
6. Increasing WordPress Upload Limit
To increase the WordPress Upload Limit do the following:
Step 1: Locate the php.ini file inside the wp-admin directory (if you’re not sure how to do this, ignore the steps below and contact your webhost who can do this for you).
Step 2: Find the following line in your php.ini file:
upload_max_filesize
Step 3: Increase the value to 64MB or higher and save the file.
Step 4: If you still have issues, look for this file in your root directory and make the same changes.
7. I cannot see the icons on my site?
This is probably because of a permission issues with the font used to display the icons. Using an FTP client set lib/fonts/ and lib/fonts/fontawesome/ permissions to 755 and the font file permissions to 644.
8. How do I add/remove breadcrumbs?
The breadcrumbs shown in the demo are added by the Yoast WordPress SEO plugin. Install this plugin and then go to SEO -> Search Appearance and click the Breadcrumbs tab and click Enabled.
9. Increasing PHP Memory Limit
To increase the PHP Memory Limit do the following:
Method 1: Increasing Memory Limit In wp-config.php File
Step 1: Locate the wp-config.php file inside the root of your WordPress installation (located in the same folder as your /wp-content/ and /wp-admin/ directories) using an FTP client or file manager in your web hosting control panel (if you’re not sure how to do this, ignore the steps below and contact your web host who can do this for you).
Step 2: Paste this code in your wp-config.php file just before the line that says “That’s all, stop editing! Happy blogging.”:
define( 'WP_MEMORY_LIMIT', '256M' );
Step 3: Now save the file.
Note: If this solution does not work then this means your web hosting service provider does not allow WordPress to increase PHP memory limit. You will need to ask your web host to increase this limit for you.
Method 2: Increasing Memory Limit In php.in File
Step 1: Locate the php.ini file inside the /wp-admin directory using an FTP client or file manager in your web hosting control panel (if you’re not sure how to do this, ignore the steps below and contact your web host who can do this for you).
Step 2: Paste this code in your .php.ini file:
memory_limit 256MB;
Method 3: Increasing Memory Limit In .htaccess File
Step 1: Locate the .htaccess file inside the root of your WordPress installation (located in the same folder as your /wp-content/ and /wp-admin/ directories) using an FTP client or file manager in your web hosting control panel (if you can’t find it see why you can’t find the .htaccess file and how to find it or if you’re not sure how to do this, ignore the steps below and contact your web host who can do this for you).
Step 2: Paste this code in your .htaccess file:
php_value memory_limit 256M
Step 3: Now save the file.
Note: If you encounter any errors while trying to set the memory limit using these two methods then it means your hosting provider has locked this setting and you will have to contact them to increase this limit.
10. How do I restrict access to BuddyPress content?
You can use the Paid Membership Pro plugin to create membership levels, charge for access (or make it free) and restrict specific content.
You'll also need to use the BuddyPress Add On to control access to specific BuddyPress content.
11. Increasing Maximum Input Vars
Maximum input vars limit the number of input variables which affect menus and theme options in the Aardvark theme. To increase the Maximum input vars do the following:
Method 1: Increasing Max Input Vars In .htaccess File
Step 1: Locate the .htaccess file inside the root of your WordPress installation (located in the same folder as your /wp-content/ and /wp-admin/ directories) using an FTP client or file manager in your web hosting control panel (if you can’t find it see why you can’t find the .htaccess file and how to find it or if you’re not sure how to do this, ignore the steps below and contact your web host who can do this for you).
Method 2: Increasing Max Input Vars In php.ini File
Step 1: Locate the php.ini file inside the /wp-admin directory using an FTP client or file manager in your web hosting control panel (if you’re not sure how to do this, ignore the steps below and contact your web host who can do this for you).
Step 4: If you still have issues, look for this file in your root directory and make the same changes.
12. How do I restrict access to the BuddyPress members directory and profile pages?
You will need to be use the Paid Membership Pro plugin to create membership levels, charge for access and restrict specific content. You'll also need to use the BuddyPress Add On to control access to specific BuddyPress content. However this plugin does not allow you to control access to the members directory and profiles by default.
1) To add this functionality in your child theme's functions.php file add:
/**
 * Restrict viewing of the members directory and individual profiles if the user doesn't have access
 *
 */
if ( defined( 'PMPRO_VERSION' ) && defined( 'PMPROBP_DIR' ) && function_exists( 'bp_is_active' ) && ! function_exists( 'ghostpool_pmpro_bp_restrict_member_viewing' ) ) {
    function ghostpool_pmpro_bp_restrict_member_viewing() {
        if ( ! function_exists( 'pmpro_getMembershipLevelForUser' ) ) {
            return;
        }

        if ( ! is_buddypress() ) {
            return;
        }

        global $current_user;
        $user_id = $current_user->ID;

        if ( ! empty( $user_id ) ) {
            $level = pmpro_getMembershipLevelForUser( $user_id );
        }
        if ( ! empty( $level ) ) {
            $level_id = $level->id;
        } else {
            $level_id = 0;    // non-member user
        }
        if ( ! bp_is_user() && bp_is_members_component() && $level_id === 0 ) {
            //pmpro_bp_redirect_to_access_required_page();
        }
        if ( bp_is_user() && $level_id === 0 ) {
            pmpro_bp_redirect_to_access_required_page();
        }

    }
    add_action( 'template_redirect', 'ghostpool_pmpro_bp_restrict_member_viewing' );
}
3) You can control what membership levels can access the members directory by editing the following code:
Change 0 to whatever level cannot access the members directory. 0 refers to members without any level. Uncomment "pmpro_bp_redirect_to_access_required_page();" to enable the restriction.
4) You can control what membership levels can access the member profiles by editing the following code:
Change 0 to whatever level cannot access the members directory. 0 refers to members without any level. Comment "pmpro_bp_redirect_to_access_required_page();" to disable the restriction.
13. How do I modify the BuddyPress registration fields/template?
If you're using BuddyPress, then the registration page is being generated by BuddyPress and not the theme. You can add the following directory within your child theme folder /buddypress/members/register.php to override the default registration template.
14. Increasing Post Maximum Size
To increase the Post Maximum Size do the following:
Step 1: Locate the php.ini file inside the /wp-admin directory using an FTP client or file manager in your web hosting control panel (if you’re not sure how to do this, ignore the steps below and contact your web host who can do this for you).
Step 2: Find the following line in your php.ini file:
post_max_size
Step 3: Increase the value to 64MB or higher and save the file.
Step 4: If you still have issues, look for this file in your root directory and make the same changes.
15. How can I order posts by views daily, weekly or monthly?
In your child theme's functions.php add:
function ghostpool_wpp_postviews( $post_id ) {

    // Accuracy:
    //   10  = 1 in 10 visits will update view count. (Recommended for high traffic sites.)
    //   30 = 30% of visits. (Medium traffic websites)
    //   100 = Every visit. Creates many db write operations every request.
    $accuracy = 50;
    if ( function_exists( 'wpp_get_views' ) && ( mt_rand( 0, 100 ) < $accuracy ) ) {
        update_post_meta( $post_id, 'views_total', wpp_get_views( $post_id ) );
        //update_post_meta( $post_id, 'views_daily', wpp_get_views( $post_id, 'daily' )  );
        //update_post_meta( $post_id, 'views_weekly', wpp_get_views( $post_id, 'weekly' ) );
        //update_post_meta( $post_id, 'views_monthly', wpp_get_views( $post_id, 'monthly' ) );
    }
}
function ghostpool_views_meta_key_func() {
    return 'views_weekly'
}
add_filter( 'ghostpool_views_meta_key' ,'ghostpool_views_meta_key_func' );
Uncomment the post meta field you want to use. To store the weekly views of posts use:
function ghostpool_wpp_postviews( $post_id ) {
    // Accuracy:
    //   10  = 1 in 10 visits will update view count. (Recommended for high traffic sites.)
    //   30 = 30% of visits. (Medium traffic websites)
    //   100 = Every visit. Creates many db write operations every request.
    $accuracy = 50;
    if ( function_exists( 'wpp_get_views' ) && ( mt_rand( 0, 100 ) < $accuracy ) ) {
        update_post_meta( $post_id, 'views_total', wpp_get_views( $post_id ) );
        //update_post_meta( $post_id, 'views_daily', wpp_get_views( $post_id, 'daily' )  );
        update_post_meta( $post_id, 'views_weekly', wpp_get_views( $post_id, 'weekly' ) );
        //update_post_meta( $post_id, 'views_monthly', wpp_get_views( $post_id, 'monthly' ) );
    }
}
function ghostpool_views_meta_key_func() {
    return 'views_weekly' // Replace with the field name you want to order by in filters
}
add_filter( 'ghostpool_views_meta_key' ,'ghostpool_views_meta_key_func' );
To update the new views data for each post find:
$accuracy = 50;
Replace with:
$accuracy = 100;
Now when each post is viewed by you or your visitors on the frontend it will update the views data.
You only need to do this step once. When you are done change the $accuracy value again.
16. How I do I disable the WordPress Admin Bar for users?
If you're using BuddyPress to hide the admin bar for logged out users go to Settings > BuddyPress > Options and disable the Toolbar option.
17. Creating BuddyPress Profile Menus
Step 1: Go to Appearance > Menus and create or edit an existing menu.
Step 2: Click the Screen Options tab in the top right corner of the page and make sure the BuddyPress Member option is checked.
Step 3: Now scroll down the page and you will see a BuddyPress tab where you can add BuddyPress profile links to your selected menu.
18. Adding new fonts to your website
To add new fonts to your website do the following:
Step 1: Upload your fonts with the format (.ttf, .otf, .woff, .eot, .woff2) to your child theme in the directory wp-content/themes/child-theme-name/fonts/
Step 2: Create a new file called fonts.css and upload it to wp-content/themes/child-theme-name/fonts/. Add the following code to this file:
@font-face {
font-family: 'My Web Font 1';
font-style: normal;
font-weight: 500;
src: url('webfont.woff2') format('woff2'), /* Super Modern Browsers */
     url('webfont.woff') format('woff'), /* Pretty Modern Browsers */
     url('webfont.ttf') format('truetype'); /* Safari, Android, iOS */
}
Step 3: In your child theme's functions.php file add:
function ghostpool_enqueue_new_fonts() {
    wp_enqueue_style( 'ghostpool-new-fonts', get_stylesheet_directory_uri() . '/fonts/fonts.css' );
}
add_action( 'wp_enqueue_scripts', 'ghostpool_enqueue_new_fonts' );
function ghostpool_add_new_font_families( $output ) {
    $new_fonts = array(
        'My Web Font 1',
    );
    $output = array_merge( $output, $new_fonts );
    return $output;
}
add_filter( 'ghostpool_font_families', 'ghostpool_add_new_font_families' );
Where 'My Web Font 1' is the display name.
19. How do I enable comments on pages?
Go to Settings -> Discussion and make sure Allow people to post comments on new article is checked.
Now on any page click the Screen Options button in the top right corner of the page and check the Discussion option.
Yes. You can import more than one demo on your site so you can use different pages and features from each demo.
However, you can only use one set of theme options on your site. So if you import your first demo, this will import the theme options from that demo, which includes all the site colours, logo and typography. If you import another demo, the theme options from this demo will be used instead for all pages.
Options like page, header and footer layout can be changed on individual pages so these settings can be set to what you want if a demo import changes them for your existing pages.
21. WPBakery Page Builder says I need to activate a license?
The full version of WPBakery Page Builder (previously known as Visual Composer) comes with this theme. You do not need to activate a license to use it.
Free updates for the plugin will be included whenever the theme itself is updated. So after updating the theme you will see a notice at the top of your backend pages to update the WPBakery Page Builder if necessary.
You only need a license for two reasons:
1) You want to receive automatic plugin updates directly from the WPBakery developers rather than waiting for them to be included in a theme update.
2) You want to access the Template Library for additional page builder templates.
22. How do I add a custom captcha to the pop login and register forms?
In your child theme's functions.php add the following:
function ghostpool_custom_captcha() {

    /* Validation code goes here */

    return $captcha;
}
function ghostpool_custom_captcha_display() {

    /* Code to display captcha goes here */

}
You will need to get the validation code and display code for the captcha plugin that the plugin website should provide.
23. How do I set up the bbPress forum like the demo?
The forums seen in the demo site are created using the bbPress plugin. Please install and activate this plugin from Plugins > Add New and search for "bbpress".
To set up the forum layout seen in the theme demo you need to create category parents for each group of forums. For example on the demo forum (https://aardvark.ghostpool.com/original/forums/), "Forum Category 1" is a forum category and it has three child forums called "Forum 1", "Forum 2" and "Forum 3".
Go to Forums > New Forum to create a header and on the right hand side select "Category" from the Type dropdown menu.
To create a forum under this header go to Forums > New Forum and on the right hand side select "Forum" from the Type dropdown menu.
This is how the final setup should look:
24. Adding page settings to custom post types, taxonomies and templates
Add the following to your child theme's functions.php file:
In this example you're loading your own header and layout settings for a custom page template, custom post type and attachment page. You can see all the available settings from aardvark/lib/framework/settings/load-settings.php.
25. How do I remove the latest activity update in the profile header?
If you're trying to remove the latest activity text from your profile header and it doesn't exist in the activity stream you can manually delete it. In your child theme's functions.php file add the following:
delete_user_meta( $user_id, 'bp_latest_update' );
Where $user_id is the ID of the user you want to delete the text for. In most cases the admin account has a user ID of 1 e.g.
delete_user_meta( 1, 'bp_latest_update' );
Remove the code from functions.php when this has been successfully removed.
26. How do I disable the Gutenberg editor?
WordPress 5.0 introduced a new page editor called Gutenberg. Please ensure you have updated to the latest version of the theme and WPBakery Page Builder. To do this refer to your theme documentation.
Once you've done this you should see a blue WPBakery Page Builder button at the very top of your page. Clicking this disables the Gutenberg editor for this page so you can use the WPB page builder.
You can disable the Gutenberg editor permanently from WPBakery Page Builder > General Settings > Disable Gutenberg Editor.
27. How do I show inactive members in my BuddyPress members directory?
For current members:
BuddyPress will only show users in the members directory if they have logged into to their account. You can get around this and activate all user accounts by installing and activating the Retroactive BP User Activity plugin.
If this doesn't work add the following to your child theme functions.php file:
I'm not sure why I get this question so often as creating groups has nothing to do with the theme, it's part of the BuddyPress plugin. However since I'm always asked please check the following:
1) Go to Settings > BuddyPress and under the Components tab make sure User Groups is enabled.
2) Go to Settings > BuddyPress and under the Pages tab make sure a page is selected from the User Groups drop down menu.
3) To add a link to this page go to Appearance > Menus and add this page to one of your menus.
4) If you can't create user groups from the frontend, go to Settings > BuddyPress and under the Settings tab enable Group Creation if you want to allow all users to create groups. If you still can't create groups deactivate all plugins (except BuddyPress) to see if this resolves the issue. If it does, reactivate the plugins one by one to fix the problem plugin.
If no plugin is causing the issue activate the Twenty Seventeen theme, if this doesn't resolve the issue, the theme is not causing this problem and you will need to contact BuddyPress support who will be able help you.
29. How do I add a BuddyPress cover image?
Go to Settings > BuddyPress, click the Options tab and make sure Allow registered members to upload cover images is checked. Now go to your BuddyPress profile page, by clicking your username anywhere on the site and click Change Cover Image link.
30. I would like a refund?
Before requesting a refund
If you're having any issues with a theme you've just purchased this can be incredibly frustrating, however in most cases the issues can be quickly resolved.
If you still have an issue please open a ticket on the support site at: https://ghostpool.ticksy.com Please describe your problems in as much detail as possible, providing any error messages you receive.
If you have downloaded the theme this means you now have a copy of the theme and will only be eligible for a refund if it meets one or more of the following criteria:
Before I can issue a refund I need to determine that the theme is causing your issues (in most refund request cases, it turns out not to be).
To do this please open a support ticket at https://ghostpool.ticksy.com and describe your problems in as much detail as possible, providing any error messages you receive and the steps to replicate the problem.
If it does turn out to be a theme issue and I cannot fix it, you will be issued with a full refund.
Why a refund will not given
You will not receive a refund in the following situations:
you don't want it after you've downloaded it;
the item did not meet your expectations;
you simply change your mind;
you bought an item by mistake;
you do not have sufficient expertise to use the item;
you ask for goodwill; or
you can no longer access the item because it has been removed (Envato advise you to download items as soon as you have purchased them to avoid this situation).
31. I can't login because it says "Incorrect Captcha"?
This is because you have activated the Google Captcha plugin but not set it up. If you don't want to use a captcha on the login form, go to Plugins > Installed Plugins and deactivated the Google Captcha plugin.
If you do want to use this plugin, you'll need to set it up. Go to Google Captcha > Settings and click the Get the API Keys link to generate a site and secret key which you need to add to the plugin.
32. Can't access BuddyPress pages/features?
If you are using the PMPro BuddyPress Addon this plugin restricts access to BuddyPress features unless the user has the required membership.
If you don't want to restrict access to any BuddyPress feature just deactivate this plugin, otherwise do the following:
Step 1: Go to Memberships > PMPro BuddyPress and find the Unlock BuddyPress? option and select "Yes - Give non-member users access to specific features".
Step 2: Now scroll down to the Include in Member Directory option and select "Yes".
Step 3: You can now set the Unlock BuddyPress? option back to "Yes - Give non-member users access to all of BuddyPress" if you wish.
33. I can't update the theme - it says update failed?
You must now use the Envato Market WordPress plugin to update the theme. When you do, sometimes you may see an update failed message. To fix this try the following:
1) Firstly, try clicking the update link again, sometimes it doesn't work first time around.
2) If this doesn't work, activate another theme so this theme becomes deactivated and then try updating the theme.
2) If this doesn't work, check your token has the correct permissions by going to Envato Market > Settings and clicking the Test API Connection button. If you get an error, create a new token.
3 If it still doesn't work it's possible Envato's API is down and you will need to try again later.
4) If things still don't work, don't worry, just download the theme update your ThemeForest Downloads page, locate the theme, click the green Download button and select the Installable WordPress file only option. Now go to Appearance > Themes and activate another theme so you can deactivate and delete this theme. Finally click the Add New and upload the zip file you just downloaded and activate the theme.
34. I can't login after clicking my BuddyPress email activation link?
The issue is the page URL contains the activation link which does not work with the popup modal login window. To fix this use the BP Autologin on Activation plugin which automatically logs the user in after clicking the email activation link.
35. It says the theme is broken or missing a style sheet?
If after installing the theme it says it is broken or the style sheet is missing it's nothing to worry. This is one of the most common errors new users to WordPress experience. To upload the theme correctly do the following:
Go to your ThemeForest Downloads page, locate the theme, click the green Download button and select the Installable WordPress file only option.
Log in to the WordPress Admin Panel.
Go to Appearance > Themes.
Click the Add New button.
Click the Upload Theme button and upload the zip file you just downloaded.
36. Why am I not receiving emails?
This is unlikely to be a theme issue and it is most likely server or plugin related.
To test this, activate the default Twenty Twenty-One theme (don't worry this won't affect your site content). If the issues still occur this means the theme is not causing the issue. Make sure whatever plugin you're using is set up correctly and that you have no typos in your email address.
If your server does not allow emails to be sent out try using the following plugin:
This tells the theme to replace the main header primary menu with the menu "gp-new-menu-1" on the page with ID 123 and "gp-new-menu-2" on the page with ID 456. On all other pages it uses the original menu "gp-main-header-primary-nav".
You can do this for any of the theme menus using this method, just replace the filter name in step 2 with the following names:
ghostpool_top_header_left_nav
ghostpool_top_header_right_nav
ghostpool_main_header_primary_nav
ghostpool_main_header_secondary_nav
ghostpool_profile_nav
ghostpool_side_menu_nav
ghostpool_footer_nav
ghostpool_mobile_primary_nav
ghostpool_mobile_profile_nav
39. Pagination is not working on my posts
If you've added an element on a post to display some items and click the page numbers or load more button the same items may be loaded. This is because some servers do not accept the standard pagination URL structures on posts (it should be fine on pages). If this is the case activate the child theme and add the following to the functions.php file:
If you are using the Youzify plugin it will uses its own page templates and styling options for the BuddyPress pages. Exceptions include the registration and login pages.
If you want to use the theme's BuddyPress page templates and styling options you will either need to disable the Youzify plugin or modify the Youzify page templates.
You can do this by creating a directory called "youzify" inside your child theme folder and placing all the template files you want to change inside that folder (preserving directories structure).
So your directory will look something like this:
"/wp-content/themes/your-theme/youzify/"
Example:
Let’s say you want to customize some text on BuddyPress Members directory page, you will be copying the file index.php which is located here:
You will find all youzify templates on the path "youzify\includes\public\templates\"
41. Enabling the "BuddyPress Legacy" Template Pack
This theme requires that you enable the BuddyPress Legacy template pack. To do this go to Settings > BuddyPress > Options and from the Template Pack dropdown menu select "BuddyPress Legacy" and click Save Settings.
42. Grey images when importing demo data
When you import that demo data the images seen on the demo site are not imported, instead plain grey images are imported. This is done for two reasons:
1) These images are copyrighted and not licensed for distribution.
2) These images would increase the size and execution time of the import dramatically making it more likely the import failing.
43. Editing registration emails
If you are using BuddyPress then this plugin controls the registration emails not the theme. To change BuddyPress emails see: https://codex.buddypress.org/emails/
If you're not using BuddyPress you can add the following filters to your child theme's functions.php file:
If a WPBakery Page Builder update is available you will see a notice in your dashboard. Unless you purchased the plugin separately you cannot update the plugin automatically. You will need to wait for a theme update to be released which will include the updated version of the WPBakery Page Builder which you can then update from Appearance > Install Plugins.
46. Default image dimensions and registering new image dimensions
This theme uses WordPress's native image resize function add_image_size(). You can edit the theme's predefined image sizes by adding the following code to your child theme's functions.php file. You can change the image width, height and cropping options (including cropping position) for any of the image sizes. You will then need to run the Regenerate Thumbnails plugin after uploading these changes to recrop all your images to the new dimensions.
If you want to add your own image sizes to the selection, instead of changing a predefined image, add the following code to your child theme's functions.php file and add your new image sizes as shown below:
48. Users can't see activity when Youzify is activated
If you're using the Youzify plugin go to Youzify > General Settings > Wall Settings and disable the Privacy setting.
49. How to change the membership circles image on the homepage?
Edit the page called "Home Original", and click the blue Backend Editor button to show the WPBakery Page Builder editor if you haven't done so already.
Now follow the steps in the image below:
50. After updating BuddyPress my website won't load or I get a fatal error?
If after updating to BuddyPress 12.1.1 your website won't load or you're getting a fatal error similar to this:
PHP Fatal error: Uncaught Error: Call to undefined function bp_core_get_user_domain()
It is likely a conflict with bbPress or another BuddyPress compatible plugin.
52. I can't change the site title and description on the homepage?
If you're using the homepage imported from the demo data and have Yoast SEO activated then the site title is being pulled from this homepage. Edit the page, scroll down to the Yoast SEO panel and edit the Site Title field.
53. Error messages on Youzify Activity page
If you are getting the following error message on your Youzify Actitivty page:
"Notice: Undefined index: in /nas/content/staging/aardvarkdemo/wp-content/plugins/youzify/includes/public/core/wall/yz-class-privacy.php on line 255"
Add the following code to your functions.php file and then refresh the Activity page twice. Now remove the code from your functions.php file and this should fix the issue.
54. Limit the number of cores using MAGICK_THREAD_LIMIT
In certain versions of ImageMagick there is a problem when trying to import the demo images and the system becomes extremely slow. This causes the demo importer to never complete. You can use a workaround to fix this as follows:
Access the root of your WordPress installation (located in the same folder as your /wp-content/ and /wp-admin/ directories) using an FTP client or file manager in your web hosting control panel where your .htaccess is located. If you can’t find it, then look at this article on why you can’t find the .htaccess file and how to find it.
Next, add this line to your .htaccess file:
SetEnv MAGICK_THREAD_LIMIT 1
This code limits the number of cores using MAGICK_THREAD_LIMIT which is used when uploading the demo images.
55. Finding the cause of your issue(s)
To find the cause of the issue(s) please do the following:
1. Update The Theme/Plugins
Ensure you using the latest version of the theme and required plugins. We will not look at any issues if you haven’t updated these. To update the theme and required plugins please refer to the theme documentation.
2. Switch Themes
If updating the theme/plugins didn't fix the issue go to Appearance > Themes and activate the Twenty Twenty-One theme and see if the issue(s) still occur. If your site has visitors you can use the Theme Test Drive plugin so your users don’t see the theme you’ve switched to.
If the issue(s) still occur this means the theme is not causing the issue and this is probably a general WordPress or plugin issue.
3. Deactivate All Plugins
To see if it is a plugin issue deactivate all activated plugins (except the plugins that are needed to test the issues). If this fixes the issue(s) this means the theme is not the cause. Reactivate the plugins one by one or in groups so you can identify which plugins are responsible.
4. If the theme is responsible
If the issue only occurs when this theme is activated it looks like the theme is responsible. Please provide WordPress admin access and I'll take a closer look.
56. My BuddyPress widgets have disappeared?
BuddyPress widgets have been removed from version BuddyPress version 12.0.0 and later.
You can restore these widgets by using the BP Classic plugin. Please note, the widgets will not automatically reappear. You will need to manually readd them to your sidebars from Appearance > Widgets.
57. Theme and Youzify login forms
The theme comes with its own popup login form. You can enable this from Aardvark > Theme Options > Membership > Frontend Popup Form.
If you are using Youzify and have their membership system enabled, the theme's login form is disabled as the two membership systems conflict.
You can disable Youzify membership system from Youzify Panel > General Settings > Activate Membership System.
If you want to use Youzify membership system you can enable their popup login form from Youzify > Membership Settings > Login Settings > Enable Login Popup.
58. How to install the default Twenty-Twenty * themes?
You may want to install the default WordPress theme in order to see if an issue still occurs when switching themes.
To install the default WordPress theme do the following:
Go to the "Appearance" section on the left-hand side menu, and then click on "Themes". This will take you to the themes management page.
At the top of the themes page, you'll see an option called "Add New". Click on it.
In the "Add Themes" page, you'll see a search bar on the right - search for "Twenty Twenty Four".
Hover over the theme and you'll see an "Install" button. Click on it to begin the installation process.
After the installation is complete, you'll see an "Activate" button. Click on it to activate the theme on your WordPress site.
59. Media uploaded via Activity post are not shown
Media such as images uploaded when posting an Activity update using Youzer plugin may not show in the posted activity entry. To fix this add the following code to your functions.php file.
Now refresh your Activity page twice, then remove the code and the issue should be solved.
60. BP Profile Search error: Form ID # is empty or nonexistent.
If you receive the following error message where your profile search form should be after importing on the demos please do the following:
Go to Users > Profile Search and from the shortcode column copy the form ID e.g. [bps_form id=12345] would mean the form ID 12345
If the form is on your homepage:
Edit the page and via the Backend editor (WPB editor).
Click on the BP Profile Search element Pencil icon to open the edit window and replace the existing form ID with the one you just copied.
If the form is in a sidebar widget:
Go to Appearance > Widgets and locate the BP Profile Search widget.
Select the form from the Form dropdown menu and click Update.
If it's already selected and you can't click Update, just edit the title of the widget and click Update.
61. How do I add/edit the favicon?
This is a core WordPress option and not part of the theme. Go to Appearance > Customize > Site Identity > Site Icon to change the favicon.
62. Adding captcha to Login and Register forms
If you're using the theme's login/register pages or popup forms you can use one of the following plugins to add a captcha to help prevent spam logins/signups.
This is a general WordPress option that can be found under Settings -> General -> Anyone can register.
If you're using BuddyPress the register page should have been created automatically. If it has not, create a new page called "Register" and publish it. Now go to Settings -> BuddyPress -> Pages and select this page from the Registration dropdown menu. Now you can link to this page in your menus from Appearance > Menus.
64. Experiencing issues after updating from Youzer to Youzify
After updating Youzer to Youzify if you're experiencing issues make sure you are using Aardvark version 4.34 or higher.
Once you're running this version, make sure you update to the latest version of the Aardvark Plugin from Appearance > Install Plugins.
To upgrade to Youzify please follow the steps provided by the Youzify support team here: https://kainelabs.ticksy.com/article/16887/ (note steps 11 and 12 are not relevant and have already been done by the theme update).
If you still have issues, for example you're unable to see the upgrade option, you can open a support ticket at https://kainelabs.ticksy.com/ where the Youzify support team will answer your questions. Sign in with your Envato login details and open a ticket in the "Youzify Upgrade Issues category".
65. How to add custom fields
There are two ways to add custom fields depending on if you're using the Gutenberg Editor or Classic Editor.
Edit or create a new post and click Options button in the top right corner.
Select Preferences from the dropdown menu to open the Preferences window.
Click the Panels tab and then enable the Custom fields option - reload the page when asked to.
Once the page is reloaded scroll down to the bottom of the page where you will see a new Custom Fields panel.
Click the Enter New link and then give your custom field a name and the value you want to display.
Finally click the Add Custom Field button.
Classic Editor
Edit or create a new post and click Screen Options button in the top right corner.
Check the Custom Fields option.
Scroll down to the bottom of the page where you will see a new Custom Fields panel.
Click the Enter new link and then give your custom field a name and the value you want to display.
Finally click the Add Custom Field button.
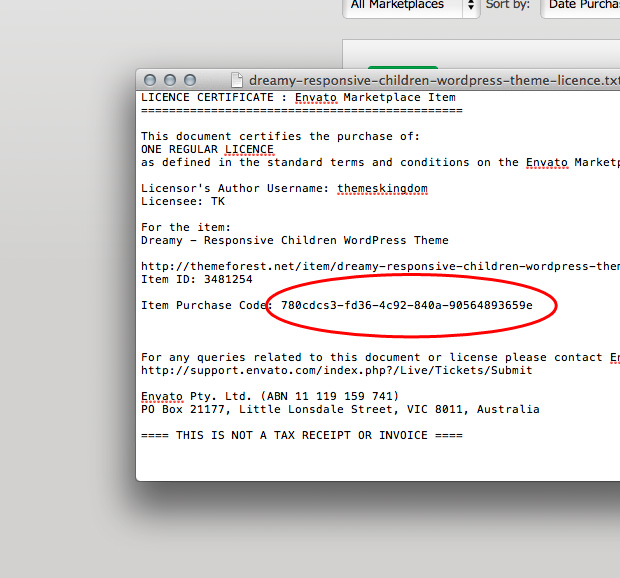
66. How do I find my ThemeForest Item Purchase Code?
To find your licence key/purchase code you need to log into your ThemeForest account and go to your “Downloads” page.
Locate the relevant theme and click on the Download button and next on the License Certificate & purchase code link in drop-down menu.
After you have downloaded the certificate you can open it in a text editor such as Notepad and copy the Item Purchase Code.
67. I can see shortcodes in my excerpts - how do I use custom excerpts?
Excerpts do not support shortcodes or HTML, they just display unformatted text. By default excerpts will strip all the HTML tags but you'll see raw shortcodes so you'll need to use custom excerpts to remove these. To do this edit the desired post or page, click the Screen Options button in the top right corner and check Excerpt. Now scroll down to Excerpt panel to add your custom excerpt.
68. After updating Aardvark my style customisations are not working
There has been a change to the way the Aardvark Child loads the parent and child style.css files. You will need to update your child theme functions.php to fix this. Find:
70. I get a Page Not Found error when I click on links?
Sometimes your server rewrite rules need flushing. To do this go to Settings -> Permalinks and save the page.
In some cases you may need to change the permalink structure. To do this in the Custom Structure field add the following:
/%category%/%postname%/
Now save the page.
71. Load More Button showing duplicate content
If you're loading new posts using the Load More Button option in the Posts element it will load duplicate content if you have also set an Offset. To fix this add the following to your child theme's functions.php file:
Make sure to change the $offset and $posts_per_page values to what you have set in your Posts element.
72. "The link you followed has expired. Please try again." error
You are seeing this error because the theme is too big to be uploaded to your site. This is because your web host has set one of the following too low:
Follow the links for how to increase each of these values.
Alternatively you can upload the theme through an FTP client or file manager in your cPanel. To set up an FTP client refer to the WordPress documentation on this http://codex.wordpress.org/FTP_Clients.
Once you have set up your FTP client upload the aardvark theme folder to /wp-content/themes/ directory on your server.
73. BuddyPress members and groups have not been imported?
The demo importer does not import members and groups. If you want to import these you can use a plugin such as BuddyPress Default Data.